
Encoding, Decoding, and Storing Function Names
December 2019
To recap, in the first two shellcoding posts we Located EIP/RIP and Located the base address of Kernel32. In this post we will discuss the encoding, decoding, and storing Win32 function names. It is necessary to cover this topic before covering how to find Win32 API addresses using Assembly, since the techniques that will be discussed will use these concepts. The encoding we will use is a type of hashing routine that was originally written by @rick2600 and “tweaked” by Peter Van Eeckhoutte @corelanc0d3r. I originally came across this routine while researching shellcode on the Exploit-DB web site.
There are a few reasons that you would want to encode the name of the Win32 API in your shellcode. The top two reasons are:
- To Save Space
- To Avoid String Detection
When an encoded version of the Win32 API name is stored using the method developed by @rick2600 the resulting hash only occupies 4 bytes and cannot be detected by a simple “strings” routine employed by many scanning and analysis tools. Instead of storing “LoadLibraryA” for example we will instead store 0xEC0E4E8E.
Encoding/Hashing Strings For Storage
The source code that I will be discussing can be found in the PDF I linked to earlier or I have a copy stored in my shellcode-learning repository, located here:
So, what does it do? First, we shall examine the calculate_hash function:
1
2
3
4
5
6
7
8
9
10
11
12
13
14
15
16
17
18
19
20
long calculate_hash( char *function_name )
{
	int aux = 0;
	unsigned long hash = 0;
	while (*function_name)
	{
		hash = ror(hash, 13);
		hash += *function_name;
		*function_name++;
	}
	while ( hash > 0 )
	{
		aux = aux << 8;
		aux += (hash & 0x00000FF);
		hash = hash >> 8;
	}
	hash = aux;
	return hash;
}
a
First While Loop
The hash variable is initialized as an unsigned long, which is 4 bytes* (32 bits) in length. To better understand what the first while loop is doing we will focus on the 2nd iteration through the loop. The example library name we will use is LoadLibraryA. The hash variable is initialized with a value of 0 at the beginning of the function. During the first iteration of the while loop the hash variable will equal 0x0000004C. This is because the first character in the chosen Win32 library name is L which has a hexadecimal value of 0x4C. To better understand what the bitwise rotate right (ror) is doing, refer to Figure 1. By displaying the values in binary we are able to see the result of shifting the bits to the right 13 places. The value of the hash variable is 0x02600000 after the ror operation.
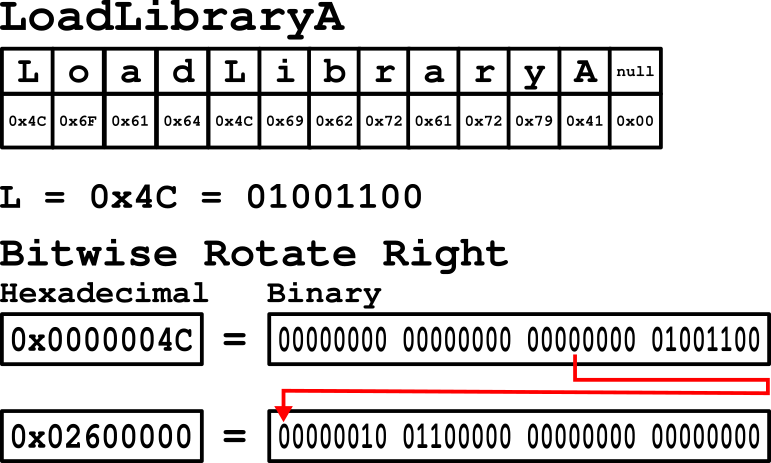
Figure 1: Bitwise Rotate Right Example
If we follow this pattern to its conclusion, the final value of the hash variable will be 0xEC0E4E8E. As an exercise of your own, see if you can work through the loop using pencil and paper or by modifying the source code of the GenerateHash.c program to see each step of the process in action.
Second While Loop
The purpose of the second while loop is to reverse the bytes of the hash to display it in Big-Endian Format. This, actually, is not necessary. As we will see in the next section on storing these hashed values, it is necessary to convert them back to Little-Endian to put into our Assembly (asm) file for storage.
At the beginning of the function the aux variable is initialized as 0. To understand what is happening we will examine the first and second iteration of the second while loop. In the first iteration a bitwise shift left is performed first. Unlike the Rotate bitwise operations that were performed in the first while loop, a bitwise Shift operation drops or truncates any bytes that shift beyond the bounds of the variable the operation is performed on. This means that the bits on the other end will be filled with 0s as well. Since the value of the aux variable is currently 0, technically, nothing is changed during the first iteration. Next, a bitwise AND operation is performed on the hash variable and the hexadecimal value 0x000000FF and the result is added to the aux variable. In the first iteration this means that aux is now 0x0000008E. The last instruction performs a bitwise shift right on the hash variable. The value of hash is now 0x00EC0E4E.
On the second iteration of the while loop the aux (0x0000008E) variable is shifted left 8 bits to become 0x00008E00 first. Next, The current value of hash (0x00EC0E4E) is ANDed and added to aux to make aux = 0x00008E4E. Finally, the hash variable is shifted right 8 bits to become 0x0000EC0E.
Once the while loop completes aux will equal 0x8E4E0EEC. This value is assigned to the hash variable and returned. Again, on your own try to complete the process using pencil and paper or modify the source code to better understand what is happening if needed.
Storing Hashed Function Names
Once the function names are hashed, they need to be stored to be useful during the execution of our assembly. To do this we will take advantage of the dd instruction in the Nasm assembler. The following assembly code simply stores the hashed value of LoadLibraryA and uses a series of calls to locate it at runtime:
1
2
3
4
5
6
7
8
9
10
11
12
13
14
15
16
17
[SECTION .text]

BITS 32

global _start

_start:
    jmp main
    ; Constants
    win32_library_hashes:
        call win32_library_hashes_return
        ; LoadLibraryA
        dd 0xEC0E4E8E
    main:
        jmp short win32_library_hashes
        win32_library_hashes_return:
        pop esi
What the above code does is jump to the main label, jump to the win32_library_hashes label, and finally calls the win32_library_hashes_return label. The final call pushes the return address, the address of our hashed function name, to the stack. The address is then popped from the stack and stored in ESI.
Hashing Function in Assembly
Finally, a bit of a preview of the next blog post. We will take a quick look at how to perform the hashing steps using Assembly instructions. The following Assembly instructions will hash a string that is stored in the ESI register.
1
2
3
4
5
6
7
8
9
10
11
12
13
14
15
16
17
18
19
20
21
22
23
24
25
26
27
28
29
30
[SECTION .text]

BITS 32

global _start

_start:
    jmp main
    ; Constants
    win32_library_hashes:
        call win32_library_hashes_return
        ; LoadLibraryA
        db "LoadLibraryA", 0
    compute_hash:
        xor edi, edi
        xor eax, eax
        cld
    compute_hash_again:
        lodsb
        test al, al
        jz compute_hash_finished
        ror edi, 0x0D
        add edi, eax
        jmp compute_hash_again
    main:
        jmp short win32_library_hashes
        win32_library_hashes_return:
        pop esi
        jmp compute_hash
    compute_hash_finished:
The Assembly code begins by using the same trick to store and retrieve the location of a constant as demonstrated in the previous section. This time, however, the value stored there is the string LoadLibraryA. Next, with the location of the string stored in the ESI register, the compute_hash routine is called. The routine zeros out the EDI and EAX registers and clears the Direction Flag (DF). It then loads the first byte of the string, performs a test see if the end of the string has been reached. If the end of the string has been reached it jumps out of the routine. It then performs the Rotate Right ROR operation, rotating the bits 0x0D (13) places. Then adds the value in EAX to EDI and loops. This code does exactly the same process as what is done in the GenerateHash.c code. EDI should contain 0xEC0E4E8E after the hashing routine completes.
As an exercise on your own, assemble the above code and run it in a debugger to verify that EDI does contain the expected value at the conclusion of the code.
Conclusion
The process of hashing and storing a Win32 API function name does not make for the most exciting shellcode focused blog post but, it is necessary to understand before we move on to finding the addresses of these functions. In this post we covered how to encode the function names using the GenerateHash.c program, how to store data and retrieve it and, finally, how to perform the same hashing process in Assembly. I have not personally tried it but, it should be possible to develop your own variation of these hashing routines to avoid signature based detections meant to look for this specific hashing routine. The only thing you would need to make sure of is that the resulting value from your hashing routine is unique so you avoid finding the wrong Win32 API function address.
In the next blog entry, we will cover the process of locating and storing the Win32 API function addresses so that they can be called later. I hope you found this educational. Thank you for taking the time to read it!