
Shellcoding: Finding EIP/RIP
December 2019
While studying for my Offensive Security Certified Expert (OSCE) certification I spent a considerable amount of time researching how to author custom shellcode. This is the first of a series of blog posts that I intend to publish that will detail some of the techniques that I learned along the way. The focus of this blog post will be to describe how to find EIP/RIP and what you may want to do with it once you have located it. The OSCE focuses souly on 32-bit systems, as part of my continued learning I will research and document methods that will work with a 64-bit system. This goes beyond what is necessary for the OSCE but is part of my own continued learning process.
I will not cover all possible methods to find EIP and RIP in this blog post. I will cover ones that I am familiar with and have researched. If you are interested in finding more methods, I encourage you to do your own research and embark on your own learning journey. What you see here is the result of my own learning journey, I hope that it helps you in some way. I am also aware that these topics have been covered by many over the years and are nothing new, the point is not to present something new but to aid in my own learning process and maybe, help someone else begin their own journey.
EDIT: Thanks to a great reply from @TheColonial to my Twitter announcement of this blog I was able to add a variation to the FPU method. Thanks again for the tip! The updated section can be found here.
Finding EIP: 32-bit Assembly Methods
I will begin with the methods I found to locate EIP using x86 Assembly (32-bit) instructions. There are two methods and they both can be useful depending on the situation and restrictions that you may be facing. Both methods will accomplish the same goal of finding EIP. The first method that I will detail is slightly smaller than the second, by a single byte. Both methods accomplish the exact same objective, to store the value of EIP in the EAX register. Both methods are NULL (0x00) byte free. The reason you would use one over the other comes down to size or character restrictions that you may encounter.
Method 1: Using FPU Instructions
This method was first documented by Aaron Adams in the Vulnerability Development mailing list here. The method he used takes advantage of the x87 Floating-Point Unit (FPU) Registers to obtain the value of EIP. The following basic assembly code will store the value of EIP in the EAX register.
1
2
3
4
5
6
7
8
9
10
11
[SECTION .text]

BITS 32

global _start

_start:
    fldz
    fnstenv [esp-0x0C]
    pop eax
    add al, 0x07
To activate the FPU registers the fldz instruction is executed. This instruction pushes the constant value +0.0 onto the FPU register stack (ST(0)). In the process the FPU registers are initialized and the current value of EIP is stored in the FPU Instruction Pointer Offset (FIP) register. Figure 1 details the structure of the FPU registers. This table is copied from the Intel(r) 64 and IA-32 Architectures Software Developer’s Manual, Volume 1: Basic Architecture PDF.
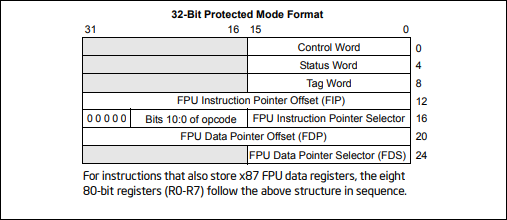
Figure 1: Protected Mode x87 FPU State Image in Memory, 32-Bit Format
The next instruction stores the FPU registers at the specified address. Since the EIP value is stored in the FIP register at an offset of 0x0C (12) using the fnstenv instruction. The target of ESP-0x0C is specified so that the FIP value will be stored at the current ESP address. Next, the value is popped from the stack and stored in the EAX register. Since several bytes worth of instructions have been executed between the time EIP was stored in the FPU’s FIP register and the time it was popped into EAX, it is necessary to adjust the value to represent the current value of EIP. To do this 0x07 (7) is added to the AL register. The AL register is used to avoid using NULL bytes.
Testing it Out
To test this out, you can assemble the code with nasm:
nasm method1.asm -o method1.asmThen plug the bytes into a c wrapper:
1
2
3
4
5
6
7
8
char code[] = "\xD9\xEE\xD9\x74\x24\xF4\x58\x04\x07";

int main(int argc, char **argv)
{
   int (*func)();
   func = (int (*)()) code;
   (int)(*func)();
}
Compile the code with MingW:
i686-w64-mingw32-gcc-win32 method1.c -o method1.exe -fno-stack-protector -no-pie -m32Run the resulting PE file in your favorite debugger and see how it works. You will need to mark the .data section as executable. You can do that with the degger or with a tool like LordPE, etc. If you do not mark the .data section executable, you will get an access violation when execution reaches your shellcode. I recommend searching for the call eax instruction in the PE file and setting breakpoints, the first call to EAX will be to the shellcode. If all goes well, EAX will point to EIP at the moment execution of the add al, 7 instruction, see Figure 2.

Figure 2: EAX points to EIP
Method 1 Alternate - Using Subtraction
Thanks to advice from @TheColonial to use subtraction from the EAX register instead of an add al instruction to avoid failure in certain situations, I am adding this alternate method. The issue, as he correctly pointed out, is that by adding to the AL register it is possible that if the additioin would result in a carry, that EAX would point to the wrong location. For example, if the AL register contains anything greater than or equal to 0xF9 adding 0x07 to it would result in the carried 1 being dropped. For example, if EAX contains 0x001234F9 and we add 0x07 to the AL register (0xF9), the resulting value will be 0x00123400 not the 0x00123500 we need.
To overcome this issue, and avoid null bytes, it is possible to subtract a negative value from EAX. Basic arithmatic, subtracting a negative value results in addition. Simple but effective. The corrected code is below and avoids NULL bytes and is only one byte larger:
1
2
3
4
5
6
7
8
9
10
11
[SECTION .text]

BITS 32

global _start

_start:
    fldz
    fnstenv [esp-0x0C]
    pop eax
    sub eax, -0x07
In Figure 9 we can see that the suggested code does work and would be more reliable than the original code.

Figure 9: EAX points to EIP
Method 2: Using Jumps and Calls
The second metod is just one byte longer than the first and accomplishes the goal of storing the value of EIP in the EAX register. I learned of this method from Phrack issue 62, Phile 7 titled History and Advances in Windows Shellcode. This article was written by SK Chong. To get EIP this method uses a series of jumps and calls that result in the value of EIP being stored in EAX. The original files from SK Chong’s article are no longer available but, I was able to track down a few of them. In his examples, he used db entries to hard code these jumps and calls. The version I am about to present can be more easily read and assembled with nasm.
1
2
3
4
5
6
7
8
9
10
11
12
13
14
[SECTION .text]

BITS 32

global _start

_start:
    jmp label2
    label1:
        jmp getEIP
    label2:
        call label1
    getEIP:
        pop eax
What happens in the above code is that the execution jumps to label2, a call instruction that calls label1. When a call is executed the return address, the address of the next instruction, is pushed to the stack. Execution then jumps to getEIP which popps the return address into EAX. No muss, no fuss.
Testing it Out
You can test Method 2 in the same way that Method 1 was tested. When execution completes the results should look similar to Figure 3.

Figure 3: EAX points to EIP
Finding RIP: 64-bit Assembly Methods
A good place to start is to see if the methods that worked in a 32-bit architecture work in a 64-bit world. Why reivent the wheel when all that is needed may be some slight modifications?
Method 1: Using FPU Instructions
Attempt 1
Using the FPU instructions could work since the instructions are still valid under x64 Assembly. First, to find out what happens if no or mimimal modifications are made to the instructions that were used while running in 32-bit mode. To do this I launched x64dbg and executed notepad.exe and ran it until I hit the EntryPoint. Using the Assemble command I hand jammed the 32-bit instrtructions in place of the first few instructions. The result of doing this can be seen in Figure 4. There are a couple things to note here. First, the 67: that appeared in front of fnstenv instruction. According to the Intel® 64 and IA-32 Architectures Software Developer’s Manual Volume 2 (2A, 2B, 2C & 2D): Instruction Set Reference, A-Z section 2.1.1, the 67h prefix is an address-size overide. This would appear to be necessary since I used the ESP register and not RSP. Second, I was unable to use the POP EAX instruction, I had to use POP RAX.

Figure 4: Finding RIP with FPU Instructions, Attempt 1
Running this sequence results in partial sucess. (See Figure 5) RAX points to the instruction before RIP when the addition was performed. This is because of the 67h address-size prefix that was neccessary. This would be easy to compensate by simply adding 0x08 instead of 0x07. Go ahead, give it a shot on your own to see if it works.

Figure 5: Finding RIP with FPU Instructions, Attempt 1 Results
Writing the Assembly
Now that it has been proven that it is possible to use the FPU registers to retrieve the value of RIP. The next step for me is to see if it is possible to write some assembly code that will duplicate the results from manually entering commands in the debugger. After some tweaking, this is the code that I came up with:
1
2
3
4
5
6
7
8
9
10
11
[SECTION .text]

BITS 64

global _start

_start:
    fldz
    fnstenv [rsp-0x0C]
    pop rax
    add rax, 0x07
When assembled with Nasm, the above code results in the instructions that can be seen in Figure 6. To test these instructions, I did a binary paste over the first instructions of a 64-bit process I opened with x64dbg. As you can see, there is now a new 48h prefix on the add rax, 0x07 instruction. This, acoording to Intel® 64 and IA-32 Architectures Software Developer’s Manual, Combined Volumes: 1, 2A, 2B, 2C, 2D, 3A, 3B, 3C, 3D and 4 section 3.7.2.1 is a REX prefix, which allows an instruction to address an 8-bit register. The assembler is able to drop the NULL bytes this way. Also, since the address size prefix is not required for the fnstenv isntruction when used with RSP instead of ESP, adding 0x07 bytes to RAX should result in RAX containing the address of RIP.

Figure 6: Finding RIP with FPU Instructions, Final
Method 2: Using Jumps and Calls
Before beginning to test this method I expect it to work with minimal modification. I expect that changing EAX to RAX will be necessary at a minimum. These kinds of jumps and calls are a bit more difficult to hand jam into a debugger so I chose to start with writting some assembly code first. The following code is what I chose to use for the first attmpet:
1
2
3
4
5
6
7
8
9
10
11
12
13
14
[SECTION .text]

BITS 64

global _start

_start:
    jmp label2
    label1:
        jmp getEIP
    label2:
        call label1
    getEIP:
        pop rax
The result of performing a binary paste over the Entry Point of notepad of the assembled code and running was sucess as can be seen in Figure 7. This method is NULL byte free still and only 10 bytes in length.

Figure 7: Finding RIP with Jumps and Calls, Final
Method 3: Loading the Effective Address of RIP
After getting the first two methods to work with a 64-bit architecture, I wanted to see if there were any better ways. While searching I came accross an article posted by Booze | Allen | Hamilton that detailed a method implemented by Rapid7 in Metasploit that uses the LEA instruction to get RIP. After some trial and error, and playing with Nasm command line switches I came up with the following code that would duplicate the method used by Metasploit:
1
2
3
4
5
6
7
8
9
10
[SECTION .text]

BITS 64

default rel

global _start

_start:
    lea rax, [_start]
When assmebled with Nasm using the following flags, the resulting code is NULL byte free and only 7 bytes long. The -O0 flag tells Nasm not to perform optimizations. If you do not use this flag the resulting optcodes will contain NULL values. Try it out yourself to see how it works.:
nasm -O0 method3.asm -o method3.binThe code and results can be seen in Figure 8.

Figure 8: Finding RIP with the Load Effective Address (LEA) Instruction, Final
Conclusion
I have now detailed several methods of finding EIP or RAX depending on the architecture that is being targeted. Obtaining these values dynamically is important if you wish to perform other operations that interact with your shellcode. Decoding, copying, or otherwise modifying your code would be imposible thanks to ASLR without the ability to dynamically find EIP/RIP. In future posts I will continue to build on this foundation. The final entry in this series will result in authoring a fully custom shellcode, written from scatch in Intel x64 Assembly.
Thank you for taking the time to read my blog! I hope you learned something and perhaps are inspired to learn some more on your own.